
Locating Biomes from Seed Values
To learn how to find a biome from a seed, enter your world seed into our Biome Finder and select your game edition from the version menu. The map renders full terrain biomes in your browser and lets you highlight specific biomes using category filters.
Whether searching for bamboo jungles, jagged peaks, or badlands expanses, our tool calculates environment distribution without running the Minecraft client. Players use these visual boundaries to plan exploration routes, gather regional resources, or find optimal building territory.
On desktop screens, the panel on the left houses all tool controls, while results appear in the Results panel on the right. On mobile screens, the map sits at the top, controls reside in the bottom sheet under the Options tab, and coordinates appear under the Results tab.
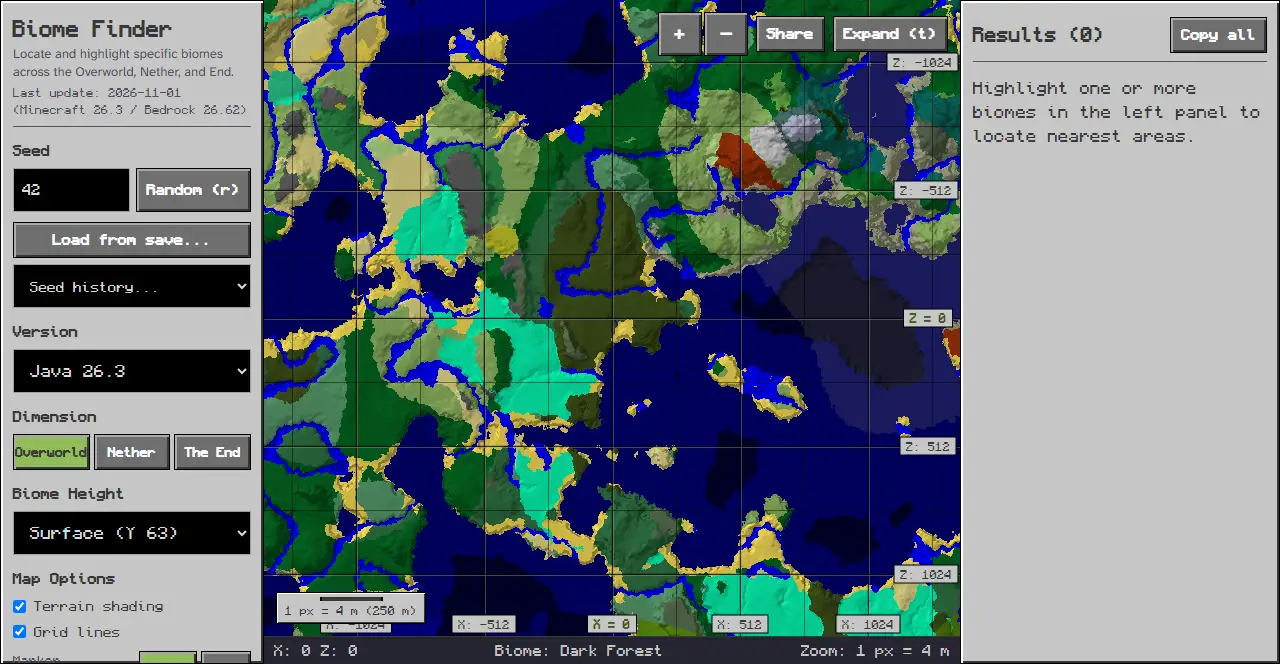
Step 1: Entering Your Seed
- In the panel on the left, locate the “Seed” input box with the “Seed or text” placeholder.
- Type or paste your numeric seed value or custom text string into this field.
- To discover new environmental layouts, click the “Random (r)” button to roll an arbitrary world seed.
- Open the “Seed history…” selector to return to seeds you analyzed earlier in your session.
- Click the “Load from save…” button to read your level.dat save file directly.
Step 2: Choosing Version and Dimension
- Open the Version menu in the panel on the left on desktop, or under the Options tab on mobile.
- This selector contains categorized groups for “Java Edition” and “Bedrock Edition”.
- Select the specific game version matching your target world.
- Under Dimension, choose “Overworld”, “Nether”, or “The End” to inspect environments across world realms.
Step 3: Highlighting Specific Biomes
Under the “Highlight Biomes” control group in the panel on the left, the tool lists every biome organized into collapsible category groups. Ancient cities generate only in the deep dark biome, and a city starts at Y -27.
- Use the “Filter biomes…” search field to filter the list by biome name.
- Click the “All” button to activate highlighting across all available biomes.
- Click the “None” button to clear all selections and select only the individual biomes you want to locate.
- Check individual boxes beside color swatches to illuminate those biomes while dimming unselected terrain.
Step 4: Navigating and Inspecting Coordinates
- To move across the world, enter target values into the X and Z fields under “Go to Coordinates (s)” and click the Go button.
- Adjust your view using the ”+” and ”-” zoom buttons to switch between broad map views and detailed local boundaries.
- Click “Expand (t)” to view the full map in fullscreen mode.
- Click the “Share” button to copy a shareable URL.
Reading Status Bar Coordinates and Results
- Move your cursor across the map to view horizontal X and Z coordinates in the bottom status bar.
- Inspect the Biome indicator in the status bar to identify the exact environment name for that location.
- Check the Zoom indicator in the status bar to view current pixel-to-block scale.
- On desktop, view coordinates in the Results panel on the right.
- On mobile, tap the Results tab in the bottom sheet to inspect coordinates.
Troubleshooting Common Finder Issues
If the map fails to highlight biomes properly, check the following points:
- Empty Seed field: Ensure a valid seed number is present in the input before searching.
- Edition mismatch: If boundaries do not match your world, check that the Version menu matches your target world edition.
- Target outside view: If selected biomes do not appear immediately, zoom out to scan wide map regions or use the “Go to Coordinates (s)” input to travel outward.
Related Exploration Guides
- To inspect structure locations across these biomes, explore our How to Find Villages from a Seed Step.
- Master overall navigation with the How to Use a Minecraft Seed Map Guide.
Sources
Tool interface and layout inspected on chunkbase.dev Biome Finder application.