
Locating Settlements from Seed Values
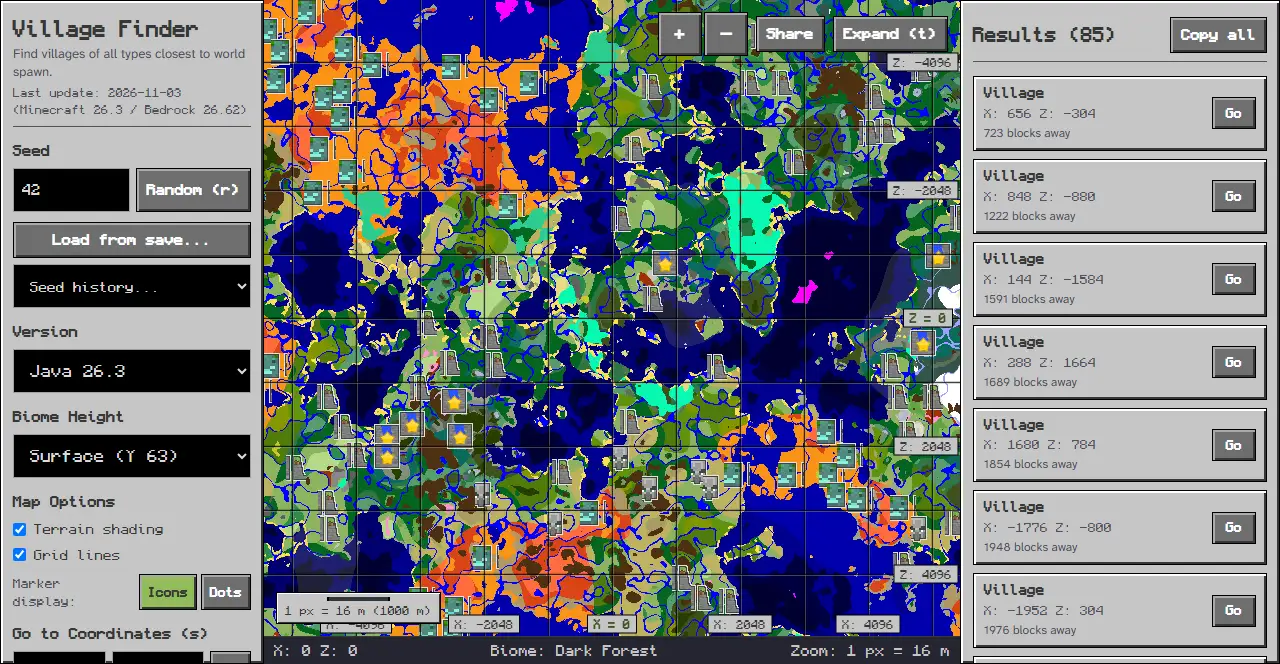
To learn how to find villages from a seed, enter your world seed into our Village Finder and select your Minecraft edition and game version. The interactive map immediately calculates settlement locations across the terrain and displays precise coordinates for each village type.
Whether you play on Java Edition or Bedrock Edition, the tool runs directly in your browser without requiring game installations or external software. Players use these settlement locations to establish bases, gather resources, or plan defensive compounds.
Step 1: Entering Your World Seed
Begin by navigating to the Village Finder tool. On desktop screens, controls reside in the panel on the left, while on mobile screens, the map appears at the top and controls are in the bottom sheet accessed by tapping the “Options” tab. Locate the “Seed” input field with the placeholder “Seed or text”. Type or paste your numeric seed or text string into this input.
To explore settlements on a fresh seed, click the “Random (r)” button to roll a new seed. You can also click the “Load from save…” button to read your level.dat file, or open the “Seed history…” selector to revisit seeds you previously explored during your session.
Step 2: Selecting Edition and Version
Next, locate the Version menu in the panel on the left. This menu groups supported releases into “Java Edition” and “Bedrock Edition” categories. Select the exact version matching your world save to display that version’s coordinates on the map.
Step 3: Filtering Village Types
In the Features section of the left rail, you can filter specific architectural settlement styles. Village spots are chosen on a grid of 34 chunks, with at least 8 chunks kept between neighbours. A village spot becomes a plains, desert, savanna, snowy or taiga village. Toggle checkboxes for “Plains Village”, “Desert Village”, “Savanna Village”, “Taiga Village”, and “Snowy Village” variants.
Use the “All” button to display every variant, or click “None” to clear active filters and focus on one specific biome style. Each enabled village type appears on the map with a distinct colored icon marker. Under Map Options, toggle checkboxes for “Terrain shading” and “Grid lines” to adjust map rendering.
Step 4: Navigating the Interactive Map
To center the map on specific locations, enter target coordinates into the “Go to Coordinates (s)” input fields for X and Z in the left rail, then click the “Go” button. The map immediately pans to that position.
Adjust your viewpoint using the zoom buttons ”+” and ”-”, or click “Expand (t)” to view the map in fullscreen mode. To save or share your current view, click the “Share” button to copy a direct URL to your clipboard.
Step 5: Reading Results and Coordinates
On desktop displays, the Results panel on the right lists coordinates and distance for settlements nearest to your view center. On mobile screens, results are viewed by tapping the “Results” tab in the bottom sheet. Clicking any entry highlights that settlement on the map canvas.
Below the map frame, the status bar displays live details as you move your mouse cursor across the terrain:
- Current X and Z coordinates of the hovered location.
- The “Biome” name at those coordinates.
- Current “Zoom” scale ratio.
Settlement Mechanics
To review technical population behavior and farm design, consult our guide:
Troubleshooting
If village icons do not appear on your map, check these common issues:
- An empty seed field halts calculations; ensure you enter a valid seed number.
- A version mismatch between Java and Bedrock produces incorrect coordinates or missing markers.
- If target coordinates lie outside current map view boundaries, use the “Go” button or zoom out to relocate markers.
Related Exploration Guides
When planning your world exploration, consult our technical guides:
Open our Village Finder to inspect your world and calculate your nearest settlement coordinates.
Sources
Tool interface and controls inspected on chunkbase.dev.